French twists are one of those hairdos that look extraordinarily convoluted, yet are entirely straightforward. At the point when you investigate a French twists instructional exercise, you’ll see that French plaits are really a style that you can do as long as you probably are aware how to interlace overall. The french braids is just somewhat more muddled than an ordinary interlace. This is the way to get it done.
1. Brush and Part
The initial step is to brush the hair, then, at that point, partition it into parts. In the event that you’re hoping to complete two interlaces, you’ll do a center part to impeccably isolate the various areas. French plaits work best on hair that has been unwashed for something like 2-3 days, as it’ll permit the hair to hold the mesh somewhat better; newly washed hair may not fill in too.
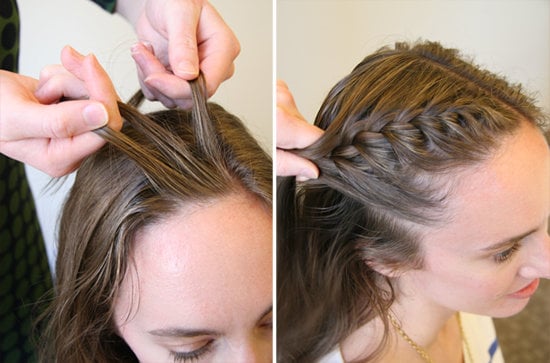
2. Assemble Three Sections
To begin the interlace, you will accumulate three segments of hair from the exceptionally front. These areas can really be minuscule; the plait will begin little, then, at that point, develop and get a lot bigger rearward of the head. Simply ensure the three areas are generally similar size for the best outcomes.
3. Twist Down to the Nape of the Neck
Then, you will do the real twisting part. French twists work precisely like ordinary interlaces, aside from one key distinction; now and again, you will add more hair into the plait. Normally, individuals add more hair on each side either every plait or each and every other plait. Settle on an example and stick to it so it looks as uniform as could really be expected.
4. Finish the Braid in the Desired Style
Whenever you’ve gotten all the hair into the twist, you ought to be at the scruff of the neck, where the twist will leave the head and proceed with only the hair. Presently, you need to pick whether you need to complete the plait in an exceptionally close way or on the other hand to make it a piece looser. Regardless, you should complete the interlace the whole way to the lower part of the hair, then, at that point, secure it with a barrette.
5. Secure With Styling Gel
The last advance is to protect your French interlaces with styling gel. Styling gel permits the twist to look smooth and excellent, however it additionally permits you to ensure there aren’t any flyaways or general irregularities. Simply take a limited quantity of styling gel onto your fingers, then, at that point, smooth the gel across the mesh start to finish.
End
FRENCH BRAIDS are a rich style that is really immortal. These interlaces are at home on the tennis court or at a high-profile occasion, and assuming you know how to do them, you’ll have the option to assist them with progressing from one to the next. Assuming you’re keen on overhauling your hairstyling potential open doors a tad, you’ll need to figure out how to do French meshes, since it’s genuinely simple but on the other hand it’s a style that is extraordinarily great.

