Preparation is a key element for a long-lasting bond. The main thing you need to make sure is that you’ve properly cleaned and prepped your scalp. Once that’s done, it’s time to attach your hairpiece. In this blog, we will look at how you can do that with a high-density poly skin hair system.
Things you need during the prep phase
- Your HD poly skin hairpiece such as the HD111 thin skin hair system
- A fine-tooth comb for your hairpiece
- Just Rite positioning spray
- A mirror – preferably a magnifying mirror to ensure thoroughness and accuracy
- Marker
Accurate placement of hairpiece
To ensure you accurately place your HD poly skin hairpiece, pinpoint your natural front hairline by using a magnifying mirror. To make life easier for you, raise your eyebrows as high as you can – place your index finger to where you feel a soft facial tissue intersecting with a harder cranial tissue. Use a comb to create an indentation on your skin and proceed to leave a temporary mark on the front edge of your hairline with your marker, right above your index finger.
Alternatively, you can use the four-finger method where you place your first four fingers above your eyebrows. The top-most part of your four fingers is where your hairline starts. Mark it.
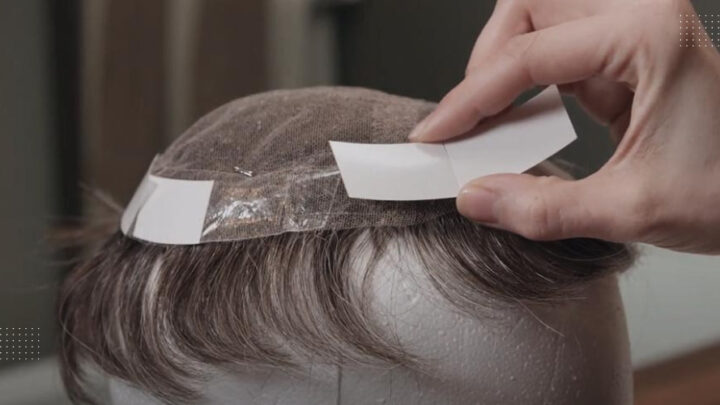
Time to attach your hairpiece
Once you’ve left a temporary mark on the front center edge of your hairline, you’re set to begin attaching the hairpiece.
First, lay your hairpiece bottom side up (the front of the hairpiece facing you) – proceed to use Just Rite positioning spray. Ensure you spray evenly onto the base – you’d want a thorough light coat on the entire base (it’s approximately seven sprays). You’ll have about a minute to place the hair system before the positioning spray dries.
Pick up the hair system by holding the hair on each side, ensuring your thumbs have the same distance from the edge of the base. Now it’s finally time to lift the hairpiece towards your head. Line up the center front edge of the hairpiece to the previous mark you left on your forehead – ensure that the front edge of the hair system is placed just above the mark you left for a more natural-looking hairline.
Gradually lay the hairpiece flat – make sure there are no bubbles underneath the base which can be done by patting the hair system down. Run your fingers through the hair from front to back and side to side to further eliminate any potential bubbles.
Carefully alight the hair system within the bonding area – it should slide smoothly to the back if everything is symmetrical and aligned right.
Just like a perfectly cooked steak – you should let your hairpiece rest for a few minutes before touching and applying further pressure to the base. The bond will fully activate after a few minutes.
After you successfully attach your hair system all on your own, give yourself a pat on the back. Your high-density hair system is ready to be styled to your liking!


